Help
- Web app
- How do I download/install this?
- Is there, or will there be, an installable iOS/Android/etc. app?
- Can you add ____ key? (Oboe third octave key, baritone saxophone low A key, half-holes, ring keys, etc.)
- Can you add ____ instrument?
- Can you add ____ new feature?
- Is the source code publicly available?
- Are you willing to consider advertising/sponsorships?
- Fingering charts
- Where are the fingering charts? I’m looking for the fingerings for ____ instrument.
- I made and downloaded some diagrams. How do I turn them into a fingering chart?
- Creating images
- Image options: Format
- Image options: Filename
- Image options: Background
- Image options: Crop to
- Show keys
- Keywork details
- Custom key sets
- Remember fingering for next time
- Edit colors…
- Custom styles
- How do I do half-holes?
- Downloading images
- Special features for donors
- Do I have to donate to use the Fingering Diagram Builder?
- What extra features are available to donors?
- How do I donate?
- How much do I have to donate to get the extra features?
- I donated. How do I get the donors-only features?
- Licensing and copyright
Web app
How do I download/install this?
There’s nothing to download or install. You can use the Fingering Diagram Builder in almost any web browser (like the one you’re using right now) on almost any computer, tablet, or phone.
Is there, or will there be, an installable iOS/Android/etc. app?
There are no plans for “native” apps at this time.
If you like, you can add the Fingering Diagram Builder to your device’s home screen for easy access.
Can you add ____ key? (Oboe third octave key, baritone saxophone low A key, half-holes, ring keys, etc.)
There is a very good chance that the Fingering Diagram Builder already has it. Check under “Keywork details.”
Can you add ____ instrument?
If it’s a woodwind then I’m interested in hearing your request. You can also send requests for non-woodwind instruments but those are lower priority and may not be suited to the FDB.
Can you add ____ new feature?
I’m interested in hearing what you have in mind, but the Fingering Diagram Builder is a side project for me. Even if I like your idea I can’t make any promises about if/when I will implement it.
Some frequently-requested features that I have no plans to add:
- The ability to put diagrams together into a chart
- The ability to add notes on a staff Update: create (separate) note images using the Note Image Generator
- The ability to add text
- The ability to choose a note and have the FDB show you the “correct” fingering
- The ability to create a diagram and have the FDB tell you what note it is, or automatically put the note name into the filename
Is the source code publicly available?
No. If you’re curious, the Fingering Diagram Builder is made with Vue.js and PHP.
Are you willing to consider advertising/sponsorships?
Fingering charts
Where are the fingering charts? I’m looking for the fingerings for ____ instrument.
There aren’t any actual fingering charts here. The Fingering Diagram Builder is a tool for creating diagrams you can use to make your own fingering charts.
I made and downloaded some diagrams. How do I turn them into a fingering chart?
There are lots of ways depending on what you’re trying to accomplish and what tools you prefer to use. Here are some possibilities.
Creating images
Image options: Format
If you aren’t sure which image format you need, I suggest .png, with “Optimize” turned on. The .svg vector format is available as a donor feature.
Image options: Filename
“Automatic” will make your image download with an automatically-generated numeric filename. “Manual” will reveal a field under the “Download” buttons, which you can use to enter a filename of your choice.
If you are entering a filename manually, you can type the following shortcuts in your filename and they will be replaced:
| Insert this into your manual filename | Automatically replaced with this |
|---|---|
| %c | current counter (automatically increments) example: 0001 |
| %i | current instrument example: clarinet |
| %k | current key set example: standard-boehm |
So, for example, you might type %i-project-%c and get a file named clarinet-project-0001.png. The counter will increase with each image downloaded (clarinet-project-0002.png, clarinet-project-0003.png). You can change the counter using the “Counter” field and it will continue to count from that number.
Image options: Background
Below: images with white background (left) and transparent background (right) inserted into documents with grey background.
You can check the “Show checkerboard” box to show how your transparent image would appear over patterned background. This checkerboard pattern will not be visible in the downloaded image.
Note that if you use the Imgur button, the image may be displayed on that site against a black background (so if you filled in keys with black, you will see just a black rectangle), or, in some cases, may automatically convert the image to a new format, such as .jpg, which does not support transparency.
Image options: Crop to
This option is available to donors only.
For cases where you need only a single diagram or several very similar ones, the default “Visible keys” cropping is probably best. It produces an image cropped to show only the currently-“visible” keys, with a little bit of extra space around the edge. Note that on touch-screen devices, or when hovering the mouse pointer over the diagram, you may see additional keys on the screen with grey outlines; those are for your reference and are not considered “visible” unless your fingering calls for them.
For cases where you plan to arrange multiple fingerings in rows or columns, “Keys in key set” or “All keys” may be helpful. “Keys in key set” always crops the image to include the area of all keys in the key set, even if they are not “visible.” That means that your images will have a consistent size. “All keys” works in a similar way, but includes keys in all key sets for that instrument, which produces consistently-sized images even if you are, for example, creating a combination clarinet/bass clarinet fingering chart.
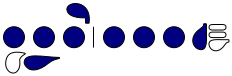
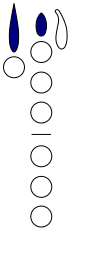
For example, notice that for the following diagrams, cropped to “Visible keys,” the tops of the images line up horizontally, but the keys themselves don’t.


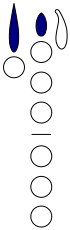
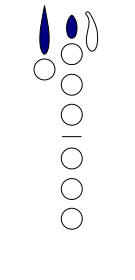
If you crop to “Keys in key set” instead, some of the images have extra white space, but they all line up neatly.
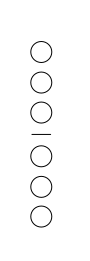
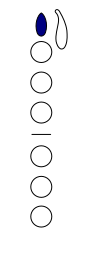
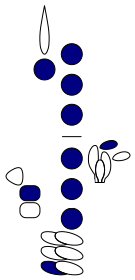
By cropping to “All keys,” you get diagrams of consistent height and width, even if they have different key sets (like “Standard Boehm” clarinet vs. “Bass clarinet, pro” as shown here).
You can check the “Show cropping line” box to show the edges of the image before you download it. This line will not be visible in the downloaded image.
Show keys
Pressing “All” will make all keys in the current key set visible as outlines, even if the keys are not in use. Pressing “Default” will revert to showing only the most important keys for the current fingering. (I recommend this to reduce visual clutter.)
Keywork details
In the “Keywork details” area, some instruments show controls you can use to turn selected keys on or off easily.
Additional control is available using the hierarchical list of keys that follows those controls (depending on the instrument, you may need to open the “More keywork details” area). Each key present in the diagram can be set to “Always,” “As needed,” or “Never.”
For more details on using this feature, refer to my blog post: Using the Fingering Diagram Builder’s advanced keywork controls
Custom key sets
If you have used the “Keywork details” area to create a custom selection of keys, you can save it in this area for future re-use. After saving, it will appear in the “Key set” dropdown list, as well as the “Custom key sets” area.
Remember fingering for next time
If this box is checked, the Fingering Diagram Builder will remember the fingering you were working on when you close your browser tab or navigate away and come back. It will also remember your fingering if you switch to a different instrument and back.
Edit colors…
This option is available to donors only.
Click the “Edit colors…” button to open a color picker that you can use to add new colors to the palette. You can use the sliders to choose colors, or you enter specific colors directly into the hex field. You can enter colors in hex format like #7fff00, rgb format like rgb(127, 255, 0), or hsl format like hsl(90,100%,50%), or you can enter the name of any CSS named color like chartreuse.
While in “Edit colors” mode, you can remove colors you have added by clicking on them in the color palette. (They are identified with a minus sign.)
Custom styles
You can save aspects of your currently-selected options for future re-use. For example, if you have created a fingering chart with diagrams of a certain size, with a certain line thickness, with transparent backgrounds, and in the future you might want to create another fingering chart with the same characteristics, you can easily recall those settings.
Use the checkboxes to indicate which current settings you want to save. In the future you can return to the “Custom styles” area and click the name of the style you want to recall.
How do I do half-holes?
For help with half-holes, refer to my blog post: Half-holes on the Fingering Diagram Builder
Downloading images
Why don’t my images “save” right on iPhone/iPad?
iOS devices do not currently allow web browsers to “save” files to the device directly. If you use the “Download” button, the image will open in the browser and you can save or share it according to your preferred method. If you want to use the “Dropbox” or “Imgur” buttons, you must enable pop-ups in your browser. Sorry!
How does the “Imgur” button work?
Imgur is a free image-hosting service. When you use the “Imgur” button, the Fingering Diagram Builder sends your image to Imgur, and opens the Imgur-hosted image in a new browser tab. You can use the URL of that tab or Imgur’s built-in social media sharing buttons to share your image. Note that Imgur will not accept .svg images (.svg format is available to donors).
Special features for donors
Do I have to donate to use the Fingering Diagram Builder?
No, you are welcome to use it for free. But there are some additional features available to donors.
What extra features are available to donors?
- Flexible image sizing
- Flexible line thicknesses
- Editable color palette
- Mirrored images (flipped left-right)
- More control of image cropping
- Image downloads in SVG format
How do I donate?
Scroll down to the bottom of the Fingering Diagram Builder and find the “Donate” form. Donations are processed by PayPal, and you can use a PayPal account if you have one, or you can use a debit/credit card. Thank you!
How much do I have to donate to get the extra features?
Any amount is acceptable and appreciated. I hope you will choose an amount that reflects how useful you find the Fingering Diagram Builder to be.
I donated. How do I get the donors-only features?
If you donated just now, your extra features should have been activated automatically on the device you used.
If you donated previously or on a different device, click the “Are you a previous donor?” link and enter the email address you used to donate.
If you have any further difficulty, please email me.
Licensing and copyright
Can I use the images in my project?
The images created with the Fingering Diagram Builder are copyrighted but are available under a Creative Commons Attribution-NonCommercial-ShareAlike 4.0 International license. You should read the explanation at the link for full details, but in general you are permitted to use the images for things like academic papers, teaching aids, blog posts, and other not-for-profit projects. A link to the Fingering Diagram Builder is much appreciated.
If your project is being sold or otherwise used for profit, you will need to contact me for permission to use the images. Often for small, self-published projects we can settle things up with a donation to the FDB (which also gives you access to its donors-only features).
If you are working with a publisher, they will generally want to contact me directly to arrange permissions. Often they have something like a standard illustrator contract that can be used or adapted.